
How to Build a Solo Leveling Inspired Life System in Notion #1
How to Build a Solo Leveling Inspired Life System in Notion #1
Build a lightweight Solo Leveling inspired life system in Notion with 1-click quest check-ins, automatic EXP tracking, level calculations, and a dashboard that keeps your progress visible.
Build a lightweight Solo Leveling inspired life system in Notion with 1-click quest check-ins, automatic EXP tracking, level calculations, and a dashboard that keeps your progress visible.


Get the Tutorial Resources
Get the Tutorial Resources
Get all the formulas used in this tutorial in one place, ready to copy and paste into Notion as you follow along.
I spent five years studying why games can make us repeat the same actions again and again. Then I started applying those mechanics to my own life.
The result is simple: build your life like an RPG. Complete daily quests, earn EXP, level up your character, and make your real progress visible.
This Notion system is a lightweight Solo Leveling inspired setup. It has three databases, a one-click quest check-in system, automatic EXP tracking, level calculations, a progress bar, and a dashboard that brings everything together.
What You'll Learn
Build three connected Notion databases for characters, quests, and EXP activity logs.
Use a Check In button to create logs and award quest EXP automatically.
Track Current EXP, levels, remaining EXP, and progress with rollups and formulas.
Create one dashboard for your character card, quest actions, and recent activity.
The Core Idea: Your Life, Your Rules
A gamified life system is not about pretending daily life is a game. It is about making progress feel more concrete.
A workout is no longer just something you should do. It becomes a quest. Reading becomes a quest. Studying, writing, cleaning, building a business, practicing a skill, all of it can become a quest that gives your character experience points.
The important rule is this: your life, your rules. You are the game master. You decide what deserves EXP, how difficult each quest should be, and how quickly your character levels up.
If you want a more complete system with habits, quests, character stats, rewards, and progression mechanics already built in, explore the Solo Leveling System in Real Life Notion template. But first, build the simple version. It teaches you how all the pieces connect.
Start With Two Notion Pages
Create two new pages in Notion:
Dashboard
Database
Keeping the dashboard separate from the databases makes the system easier to manage. The Database page is where the machinery lives. The Dashboard is where you actually play the game every day.
Build the following three databases inside the Database page:
Character, which stores your player data.
Log, which records every completed quest and EXP reward.
Quest, which holds your repeatable daily quests.
Build the Character Database
Create a new database and call it Character. This is your player profile.
Create one character entry and give it any name you like. Use your real name, a username, or a character name. This system is yours.
Add a Files & media property called Profile Picture. Upload an avatar here. It will become the visual centerpiece of your character card later.
At this point, the Character database does not need much else. The level, EXP, and progress data will come after we connect it to your quest history.
Build the Log Database: Your Game History
Create a second database called Log. Every time you complete a quest, the system will create a new entry here. Think of it as your activity history and EXP ledger.
Add these properties:
EXP earned, a Number property.
Label, a Text property.
Character, a Relation property connected to the Character database.
When creating the Character relation, make sure to enable the two-way relation. This is what allows your character to see every log entry connected to it and calculate total EXP from those records.
Create a Default Log Template
Inside the Log database, create a new template. Give it a default icon, then set the page title to the current time.
Most importantly, set the Character relation inside the template to your character entry. Every log created through this template will now automatically connect to the right character.
Set this template as the database default. That way, your future automations create clean, correctly linked records without requiring manual setup every time.
Build the Quest Database
Create your third database and call it Quest. This is where your recurring actions live.
Add a Number property called Rewarded EXP. This decides how much EXP a quest is worth.
For example:
50 push-ups could reward 50 EXP.
A focused study session could reward 20 EXP.
Cleaning your room could reward 10 EXP.
Writing for an hour could reward 30 EXP.
The values are completely personal. A quest should feel valuable enough to motivate you, but not so valuable that leveling up becomes meaningless after two days.
Try to reward effort and consistency, not only massive outcomes. A system works best when you can make progress regularly.
Automate Quest Check-Ins and EXP Rewards
Now we make the system work.
Inside the Quest database, create a Button property named Check In. Open the button automation settings and create an action: Add Page to Database.
Select the Log database as the destination, and make sure the default Log template is used. Because the template already has your Character relation set, every check-in will automatically connect to your character.
Next, edit the properties of the new Log page:
Set EXP earned using a formula that references the current Quest page's Rewarded EXP value.
Set Label using a formula that creates a readable activity message, including the quest name and the EXP gained.
The exact label formula can be customized however you want. The goal is simply to create a useful record such as completing a specific quest and earning its assigned EXP.
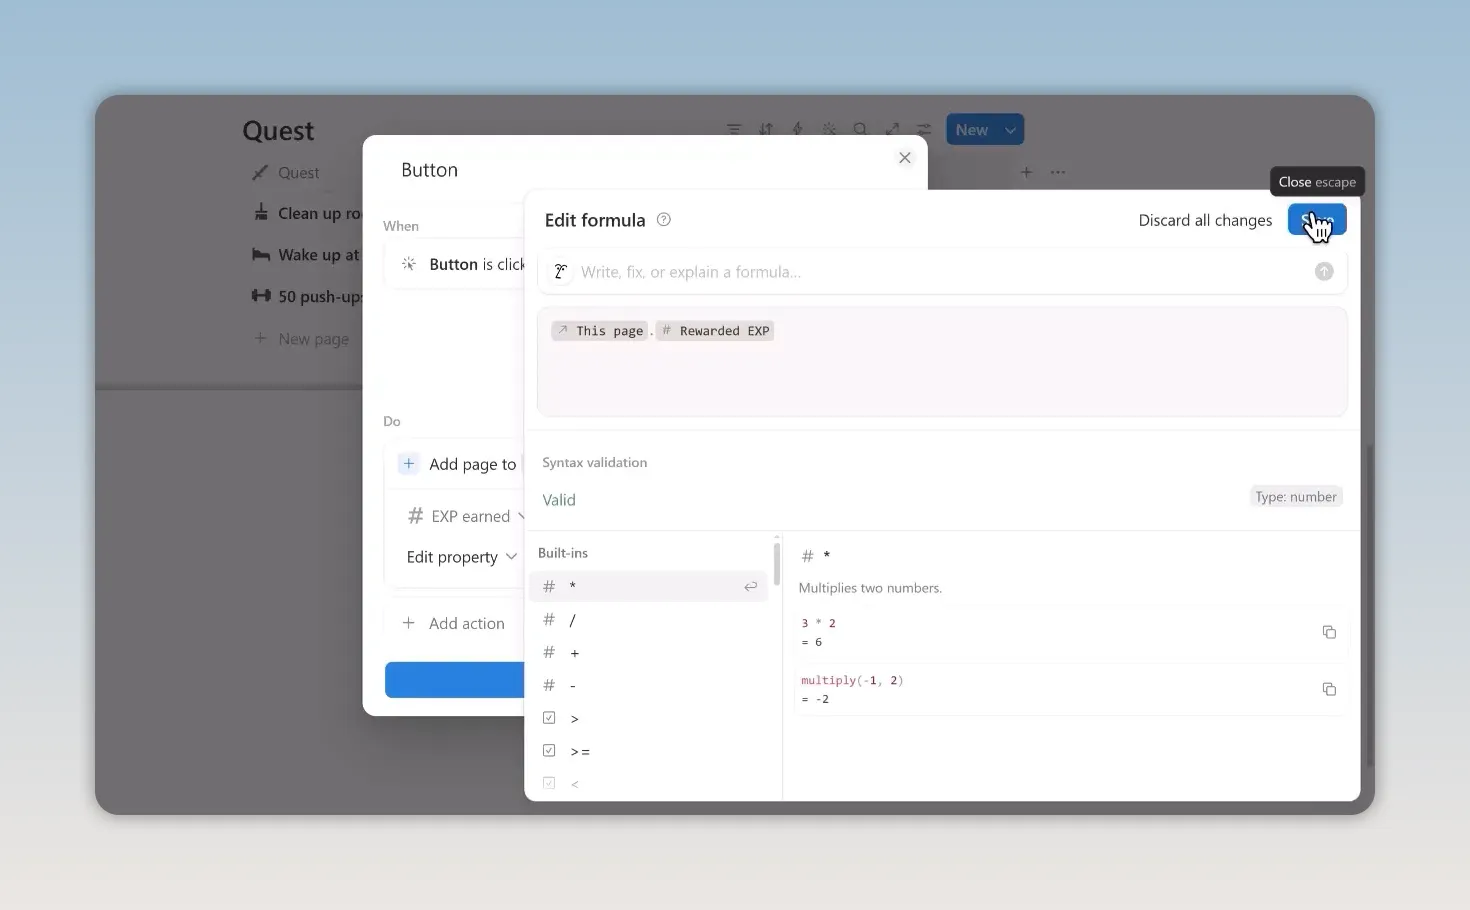
The Check In button turns one completed quest into a linked EXP log automatically.
Once this automation is saved, your system has a real feedback loop. Click Check In on a quest, create a Log entry, award EXP, and update your character.
Create Your Leveling System
Go back to the Character database. You can hide the Log relation property afterward if you want a cleaner table, but do not remove it. The relation powers the system.
Calculate Current EXP With a Rollup
Create a Rollup property called Current EXP.
Configure it to use the Log relation, select the EXP earned property, and calculate the Sum.
That rollup becomes your total experience. Every quest completion will add to it automatically.
Set Your Level Requirements
For this simple version, create five Number properties for your level thresholds. Name them something like:
Level 1
Level 2
Level 3
Level 4
Level 5
Then set your EXP requirements. For example, Level 2 could require 1,000 EXP. The exact scaling is entirely up to you.
You can make the early levels fast and satisfying, then gradually make higher levels more demanding. Or you can keep all levels evenly spaced. There is no correct answer, only a system you will actually keep using.
More advanced progression systems can calculate level requirements automatically based on a difficulty setting. That is one of the benefits of a fuller real-life RPG system in Notion, but manual level thresholds are perfect for getting started.
Calculate Current Level, EXP Remaining, and Progress
Create three Formula properties in the Character database:
Current Level
EXP to Next Level
Progress Bar
Your Current Level formula should compare Current EXP against each level threshold and return the correct level.
Your EXP to Next Level formula should calculate the difference between your current EXP and the next level requirement.
Your Progress Bar formula should turn that difference into a visual bar. The result can show both visual progress and numbers, such as 110 out of 500 EXP.
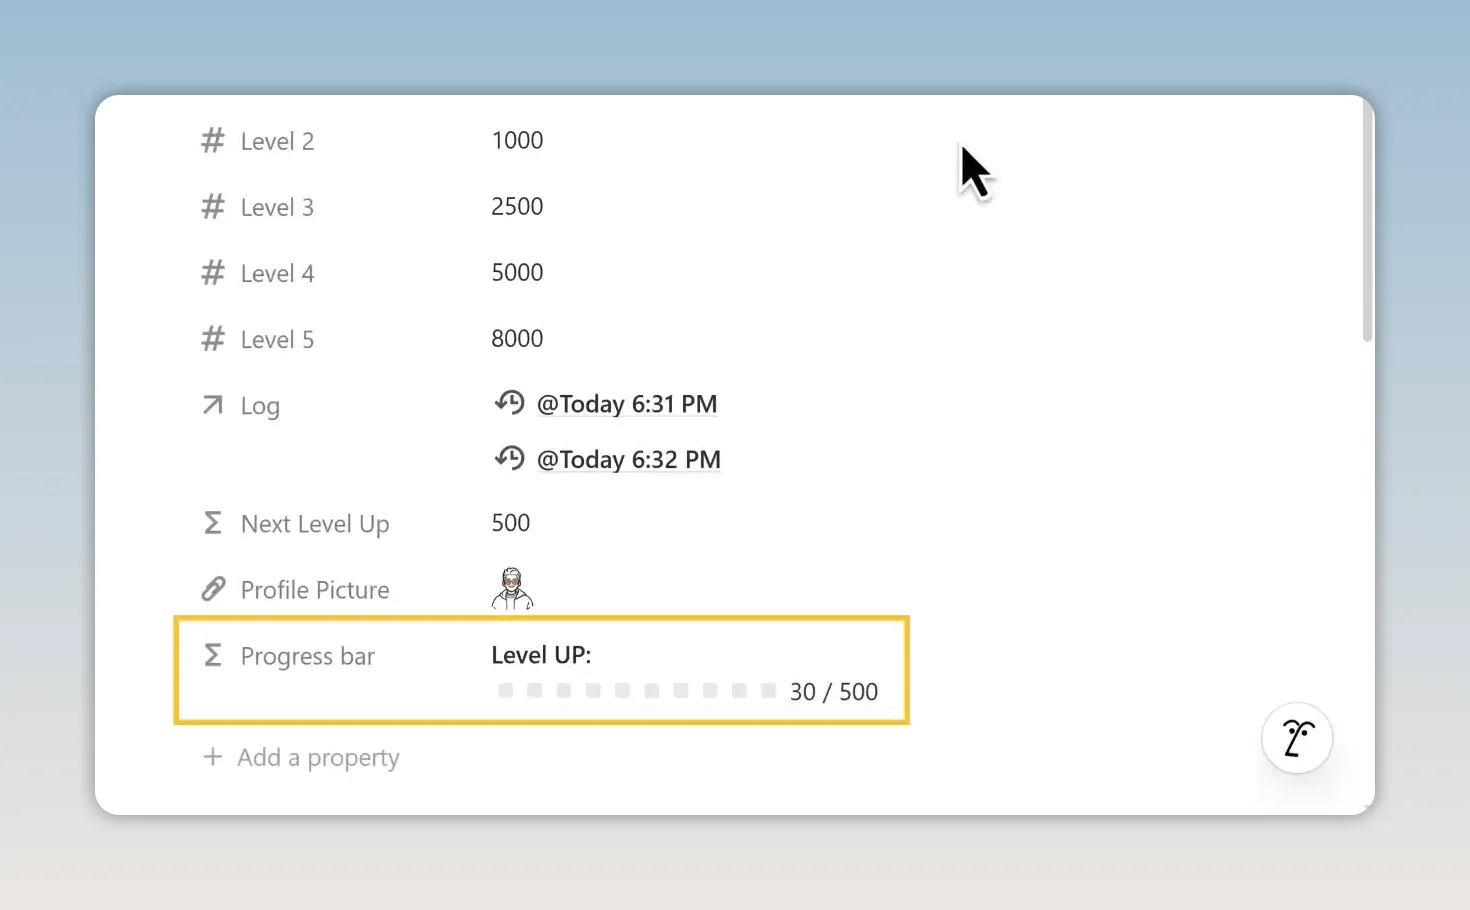
A live progress bar makes gradual progress feel visible instead of abstract.
This is my favorite part of the system. Every check-in moves the bar a little further. It gives your daily actions a visible direction.
Build the Character Card Dashboard
Now bring the system out of the databases and into a proper dashboard.
Go to the Dashboard page you created at the beginning. Use /2 columns to split the page into a left and right column.
On the left, create a linked view using /view. Choose a Gallery view and link it to your existing Character database.
In the view settings:
Turn off the data source title.
Turn on wrapping for all content.
Set the card preview to your Profile Picture property.
Turn on Fit media.
Hide the character name if you want a cleaner card.
Keep Current Level and Progress Bar visible.
You now have a character card with an avatar, level, and live EXP progress.
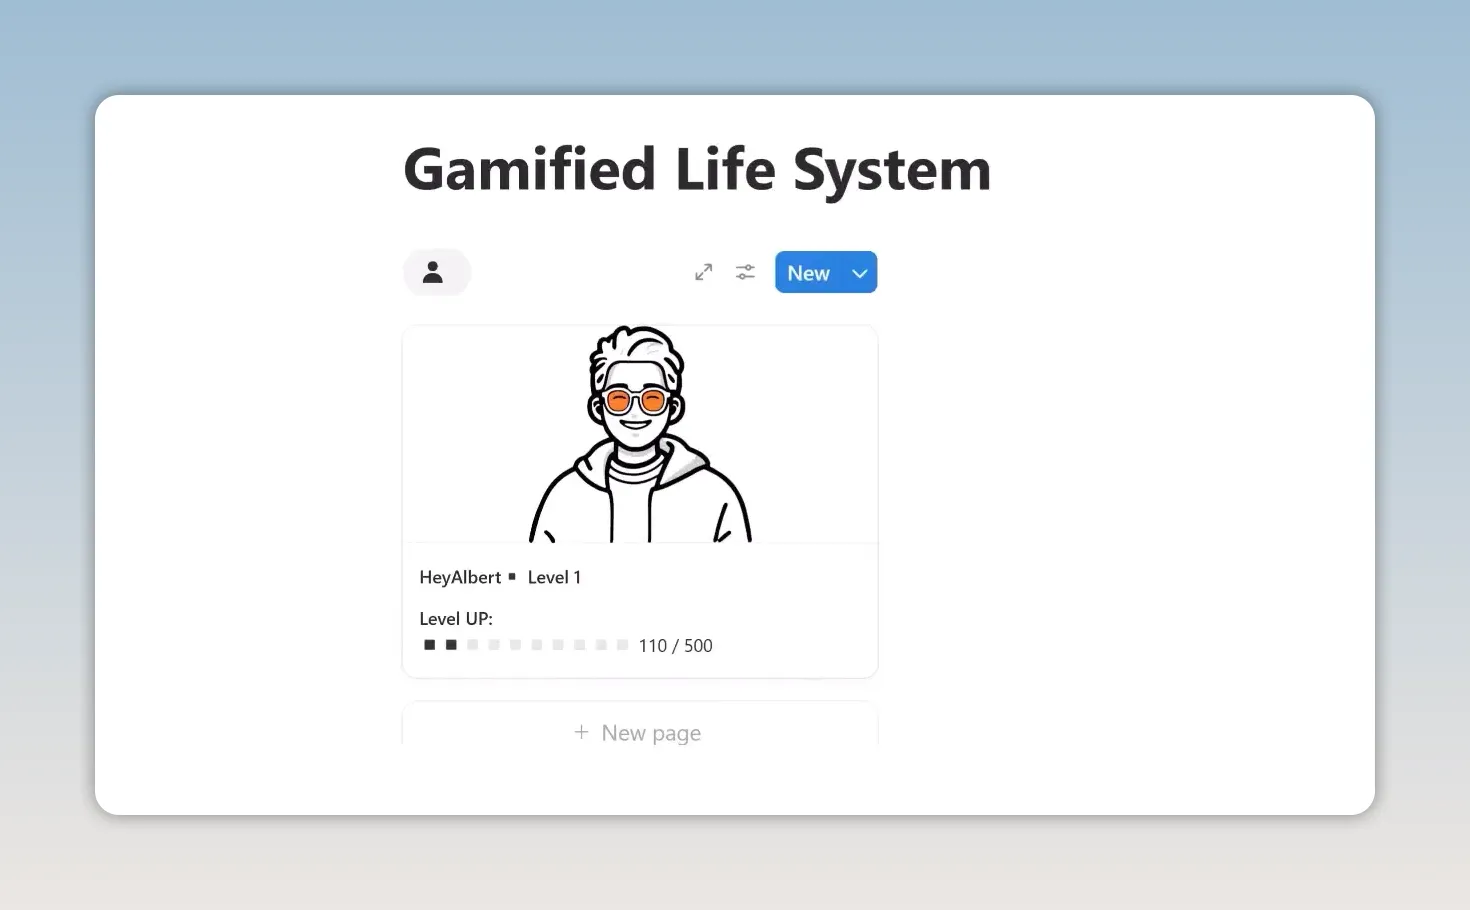
Your character card turns daily progress into something you can see at a glance.
Add a Quest Check-In Card
On the right side of the dashboard, create another linked Gallery view. This time, connect it to your Quest database.
Set the layout to Compact, turn off the data source title, and hide the view name if you want the page to stay clean.
Under Property Visibility, make sure these properties are visible:
Check In
Rewarded EXP
This is now your daily action station. You do not need to open your databases every time you finish something. Open the dashboard, find the quest, press Check In, and your character progresses.
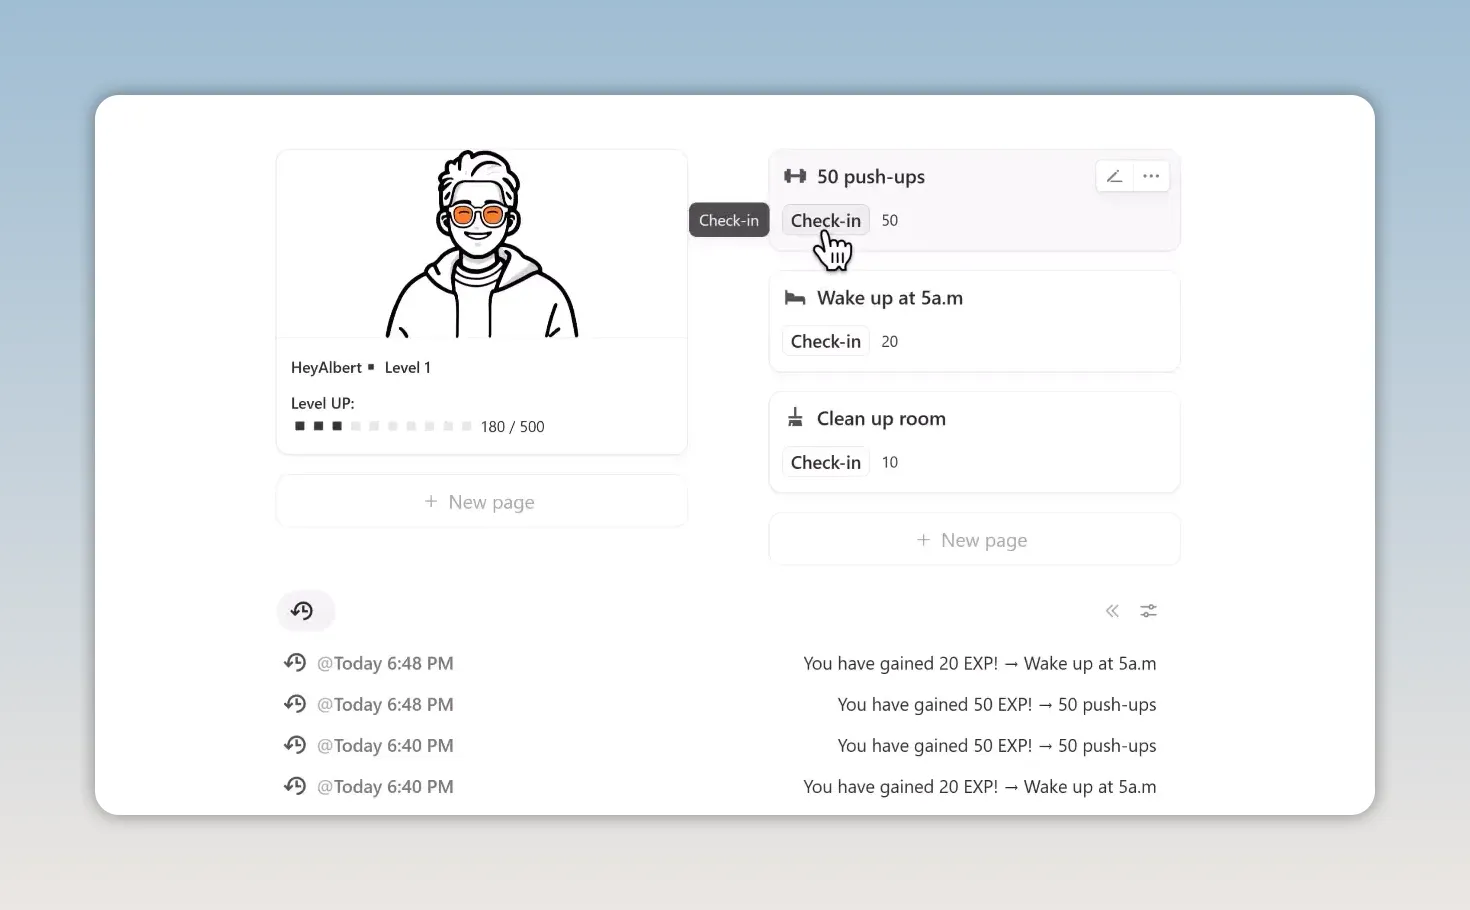
The final dashboard keeps your character, quests, and recent activity in one place.
Add an Analytics Section for Recent Activity
A good dashboard should not only tell you what to do next. It should also show what you have actually done.
Below the character card and quest check-in card, create one more linked view. Connect it to the Log database and choose List view.
In Property Visibility, make sure the Label property is visible.
Every completed quest will now appear in this activity list. You can see what you did, when you did it, and how much EXP you gained.
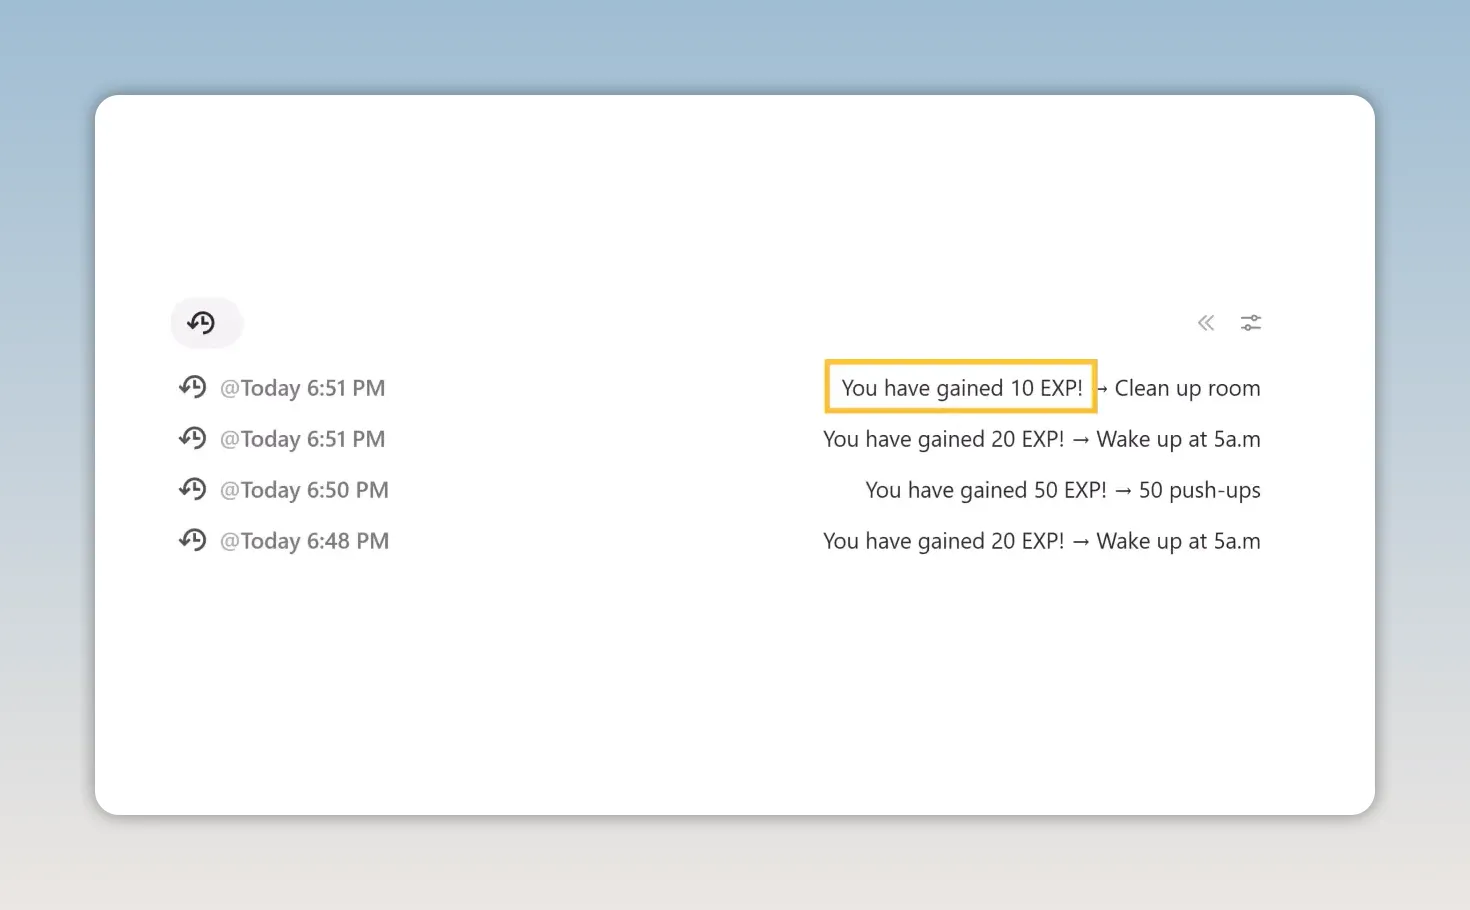
Your activity log gives every completed quest a visible record.
This matters because progress is easy to forget. A log creates evidence. It reminds you that the small actions count.
Where to Take This Gamified Life System Next
This is a simple daily quest system, but it can grow into something much bigger.
One powerful next step is a reward marketplace. You can earn currency from quests, then exchange that currency for real-life rewards you actually want. It could be a favorite meal, a movie night, a new book, time for gaming, or saving toward a bigger purchase.
If you want to build that next layer, use this guide on creating a personal reward marketplace in Notion.
You can also add a bad habit system that reduces HP when certain actions happen. That gives your character both growth mechanics and consequences, creating a more complete RPG loop.
Beyond that, a full system can include:
Character HP and recovery systems.
Badges and rank progression.
Character stats and skill tracking.
Goal progress systems.
NPCs that assign quests.
AI-assisted quest generation based on your goals.
Finance and wish list tracking.
Custom difficulty modes for EXP progression.
Start Leveling Up Your Life
Do not overcomplicate it on day one.
Create a few quests that matter. Assign reasonable EXP. Check them in when you complete them. Then keep showing up long enough to see the bar move.
That is the real power of a gamified life system. It transforms vague intentions into quests, repeated effort into EXP, and small wins into visible progression.
Give yourself a few quests today. Start checking them in. Then keep leveling up your life.
I spent five years studying why games can make us repeat the same actions again and again. Then I started applying those mechanics to my own life.
The result is simple: build your life like an RPG. Complete daily quests, earn EXP, level up your character, and make your real progress visible.
This Notion system is a lightweight Solo Leveling inspired setup. It has three databases, a one-click quest check-in system, automatic EXP tracking, level calculations, a progress bar, and a dashboard that brings everything together.
What You'll Learn
Build three connected Notion databases for characters, quests, and EXP activity logs.
Use a Check In button to create logs and award quest EXP automatically.
Track Current EXP, levels, remaining EXP, and progress with rollups and formulas.
Create one dashboard for your character card, quest actions, and recent activity.
The Core Idea: Your Life, Your Rules
A gamified life system is not about pretending daily life is a game. It is about making progress feel more concrete.
A workout is no longer just something you should do. It becomes a quest. Reading becomes a quest. Studying, writing, cleaning, building a business, practicing a skill, all of it can become a quest that gives your character experience points.
The important rule is this: your life, your rules. You are the game master. You decide what deserves EXP, how difficult each quest should be, and how quickly your character levels up.
If you want a more complete system with habits, quests, character stats, rewards, and progression mechanics already built in, explore the Solo Leveling System in Real Life Notion template. But first, build the simple version. It teaches you how all the pieces connect.
Start With Two Notion Pages
Create two new pages in Notion:
Dashboard
Database
Keeping the dashboard separate from the databases makes the system easier to manage. The Database page is where the machinery lives. The Dashboard is where you actually play the game every day.
Build the following three databases inside the Database page:
Character, which stores your player data.
Log, which records every completed quest and EXP reward.
Quest, which holds your repeatable daily quests.
Build the Character Database
Create a new database and call it Character. This is your player profile.
Create one character entry and give it any name you like. Use your real name, a username, or a character name. This system is yours.
Add a Files & media property called Profile Picture. Upload an avatar here. It will become the visual centerpiece of your character card later.
At this point, the Character database does not need much else. The level, EXP, and progress data will come after we connect it to your quest history.
Build the Log Database: Your Game History
Create a second database called Log. Every time you complete a quest, the system will create a new entry here. Think of it as your activity history and EXP ledger.
Add these properties:
EXP earned, a Number property.
Label, a Text property.
Character, a Relation property connected to the Character database.
When creating the Character relation, make sure to enable the two-way relation. This is what allows your character to see every log entry connected to it and calculate total EXP from those records.
Create a Default Log Template
Inside the Log database, create a new template. Give it a default icon, then set the page title to the current time.
Most importantly, set the Character relation inside the template to your character entry. Every log created through this template will now automatically connect to the right character.
Set this template as the database default. That way, your future automations create clean, correctly linked records without requiring manual setup every time.
Build the Quest Database
Create your third database and call it Quest. This is where your recurring actions live.
Add a Number property called Rewarded EXP. This decides how much EXP a quest is worth.
For example:
50 push-ups could reward 50 EXP.
A focused study session could reward 20 EXP.
Cleaning your room could reward 10 EXP.
Writing for an hour could reward 30 EXP.
The values are completely personal. A quest should feel valuable enough to motivate you, but not so valuable that leveling up becomes meaningless after two days.
Try to reward effort and consistency, not only massive outcomes. A system works best when you can make progress regularly.
Automate Quest Check-Ins and EXP Rewards
Now we make the system work.
Inside the Quest database, create a Button property named Check In. Open the button automation settings and create an action: Add Page to Database.
Select the Log database as the destination, and make sure the default Log template is used. Because the template already has your Character relation set, every check-in will automatically connect to your character.
Next, edit the properties of the new Log page:
Set EXP earned using a formula that references the current Quest page's Rewarded EXP value.
Set Label using a formula that creates a readable activity message, including the quest name and the EXP gained.
The exact label formula can be customized however you want. The goal is simply to create a useful record such as completing a specific quest and earning its assigned EXP.
The Check In button turns one completed quest into a linked EXP log automatically.
Once this automation is saved, your system has a real feedback loop. Click Check In on a quest, create a Log entry, award EXP, and update your character.
Create Your Leveling System
Go back to the Character database. You can hide the Log relation property afterward if you want a cleaner table, but do not remove it. The relation powers the system.
Calculate Current EXP With a Rollup
Create a Rollup property called Current EXP.
Configure it to use the Log relation, select the EXP earned property, and calculate the Sum.
That rollup becomes your total experience. Every quest completion will add to it automatically.
Set Your Level Requirements
For this simple version, create five Number properties for your level thresholds. Name them something like:
Level 1
Level 2
Level 3
Level 4
Level 5
Then set your EXP requirements. For example, Level 2 could require 1,000 EXP. The exact scaling is entirely up to you.
You can make the early levels fast and satisfying, then gradually make higher levels more demanding. Or you can keep all levels evenly spaced. There is no correct answer, only a system you will actually keep using.
More advanced progression systems can calculate level requirements automatically based on a difficulty setting. That is one of the benefits of a fuller real-life RPG system in Notion, but manual level thresholds are perfect for getting started.
Calculate Current Level, EXP Remaining, and Progress
Create three Formula properties in the Character database:
Current Level
EXP to Next Level
Progress Bar
Your Current Level formula should compare Current EXP against each level threshold and return the correct level.
Your EXP to Next Level formula should calculate the difference between your current EXP and the next level requirement.
Your Progress Bar formula should turn that difference into a visual bar. The result can show both visual progress and numbers, such as 110 out of 500 EXP.
A live progress bar makes gradual progress feel visible instead of abstract.
This is my favorite part of the system. Every check-in moves the bar a little further. It gives your daily actions a visible direction.
Build the Character Card Dashboard
Now bring the system out of the databases and into a proper dashboard.
Go to the Dashboard page you created at the beginning. Use /2 columns to split the page into a left and right column.
On the left, create a linked view using /view. Choose a Gallery view and link it to your existing Character database.
In the view settings:
Turn off the data source title.
Turn on wrapping for all content.
Set the card preview to your Profile Picture property.
Turn on Fit media.
Hide the character name if you want a cleaner card.
Keep Current Level and Progress Bar visible.
You now have a character card with an avatar, level, and live EXP progress.
Your character card turns daily progress into something you can see at a glance.
Add a Quest Check-In Card
On the right side of the dashboard, create another linked Gallery view. This time, connect it to your Quest database.
Set the layout to Compact, turn off the data source title, and hide the view name if you want the page to stay clean.
Under Property Visibility, make sure these properties are visible:
Check In
Rewarded EXP
This is now your daily action station. You do not need to open your databases every time you finish something. Open the dashboard, find the quest, press Check In, and your character progresses.
The final dashboard keeps your character, quests, and recent activity in one place.
Add an Analytics Section for Recent Activity
A good dashboard should not only tell you what to do next. It should also show what you have actually done.
Below the character card and quest check-in card, create one more linked view. Connect it to the Log database and choose List view.
In Property Visibility, make sure the Label property is visible.
Every completed quest will now appear in this activity list. You can see what you did, when you did it, and how much EXP you gained.
Your activity log gives every completed quest a visible record.
This matters because progress is easy to forget. A log creates evidence. It reminds you that the small actions count.
Where to Take This Gamified Life System Next
This is a simple daily quest system, but it can grow into something much bigger.
One powerful next step is a reward marketplace. You can earn currency from quests, then exchange that currency for real-life rewards you actually want. It could be a favorite meal, a movie night, a new book, time for gaming, or saving toward a bigger purchase.
If you want to build that next layer, use this guide on creating a personal reward marketplace in Notion.
You can also add a bad habit system that reduces HP when certain actions happen. That gives your character both growth mechanics and consequences, creating a more complete RPG loop.
Beyond that, a full system can include:
Character HP and recovery systems.
Badges and rank progression.
Character stats and skill tracking.
Goal progress systems.
NPCs that assign quests.
AI-assisted quest generation based on your goals.
Finance and wish list tracking.
Custom difficulty modes for EXP progression.
Start Leveling Up Your Life
Do not overcomplicate it on day one.
Create a few quests that matter. Assign reasonable EXP. Check them in when you complete them. Then keep showing up long enough to see the bar move.
That is the real power of a gamified life system. It transforms vague intentions into quests, repeated effort into EXP, and small wins into visible progression.
Give yourself a few quests today. Start checking them in. Then keep leveling up your life.
LiFE RPG
Gamify your Success, Level up in LiFE! The only Life Gamification System you need to Gamify your Life.
Subscribe to our newsletter
Tips, tools, tutorials, templates, and systems for gamifying your life.
Unsubscribe anytime.
Love it? Share it!